


Bookkeeping client onboarding checklist for 2026 (with templates inside)
Run your entire firm on one platform
Onboarding new bookkeeping clients is complex by nature. You have to gather information, collect financial documents, and make sure everything is in place — all before the real work even begins. This creates friction from the first interaction, and the consequences impact the whole client relationship.
Every inefficiency slows turnarounds, adds client frustration, and limits the volume of work you can manage. This bookkeeping client onboarding checklist turns friction into faster outcomes. We break down the key processes, tools, and automations for an onboarding process that builds momentum from the first engagement.
Table of сontents
The benefits of using this bookkeeping client onboarding checklist
An efficient onboarding process improves outcomes throughout the client relationship. Our free onboarding checklist streamlines the earliest interactions with new clients, but the benefits don’t end at the onboarding stage:
- Faster onboarding: remove the hassle of onboarding for clients and your team to deliver value from day one
- Improved consistency: minimize mistakes, delays, and unnecessary friction for greater consistency with every new client
- Clearer communication and expectations: set clear goals and outcomes with 100% transparency from the first interaction
- Happier clients: make a lasting impression with effortless onboarding, immediate impact, and consistent value
- Scalable client management: replace bottlenecks with processes capable of handling higher client volumes, keeping them happier, and driving more revenue
These benefits compound over time, unlocking new growth potential as you scale your firm with more efficient processes.
Comprehensive bookkeeping onboarding checklist
Before we get to the free onboarding checklists that you can download and use, let’s review the key steps of an efficient bookkeeping onboarding process.
1. Finalize the contract and agreement
Onboarding officially begins when clients sign on the dotted line of your contract agreement. This is where you confirm the scope of work, responsibilities, and timelines so everyone begins with the same understanding.
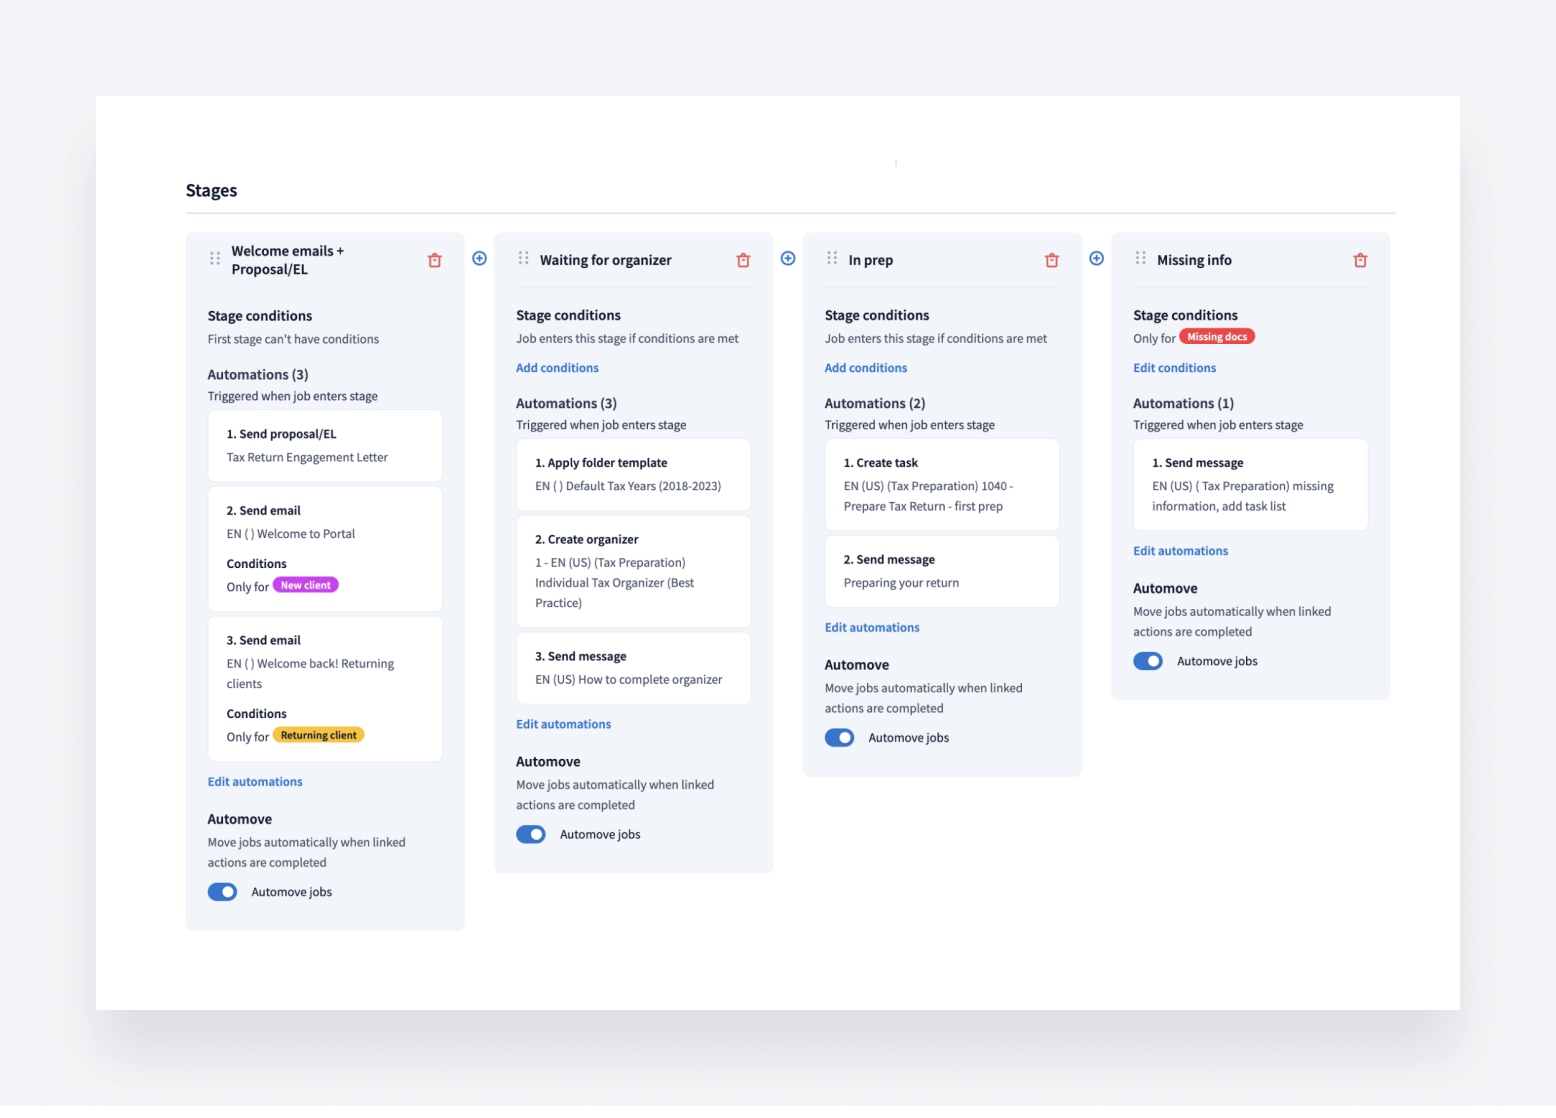
Create templates for bookkeeping services agreements and other key documents to speed this process up. You can also practice management software that automates proposals and engagement letters to run this process on autopilot.
2. Start the welcome sequence
Once the client signs, it’s time to initiate the welcome sequence. Ideally, you want to automate this process with personalized welcome emails, including confirmation of the agreement terms and any supporting information clients need for next steps.
For example, you might include an email prompting them to access their client portal.
3. Gather client and business information
Now, it’s time to build a client profile containing all of the information you need about them and their business:
- Basic information: official business name, ownership details, industry, location, and contact details, etc.
- Business operations: staff details, vendors and suppliers, customer details, inventory management, etc.
- Financial information: fiscal year, bank accounts, credit cards, revenue streams, etc.
- Accounting software: accounting tools, usage history, data completeness, etc.
- Compliance and regulatory info: Tax IDs, filing requirements, licences and permits, etc.
- Service requirements: goals, expectations, and any specific requirements they need from your bookkeeping services
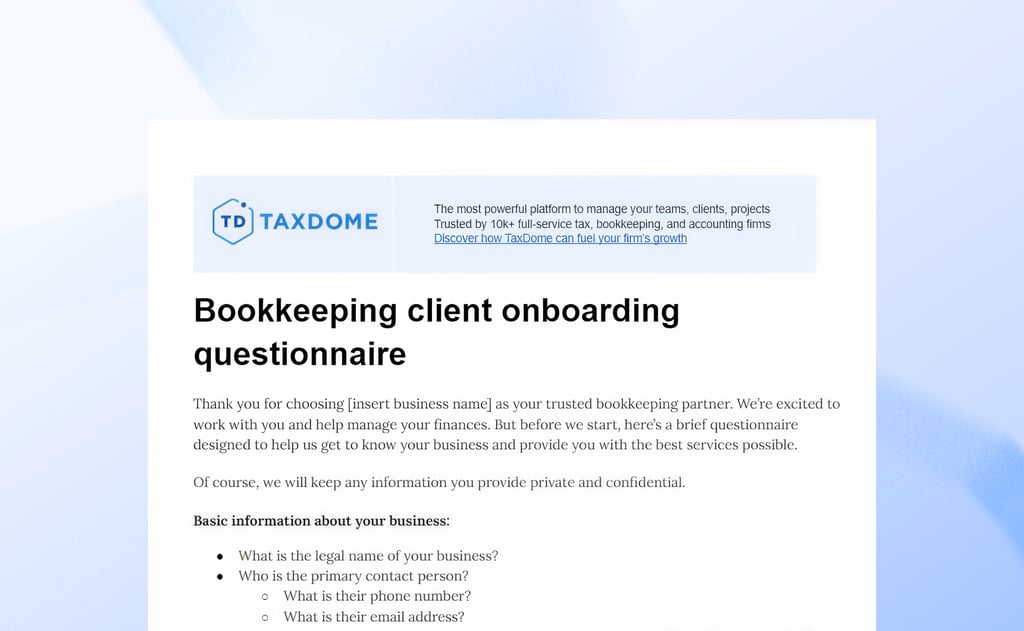
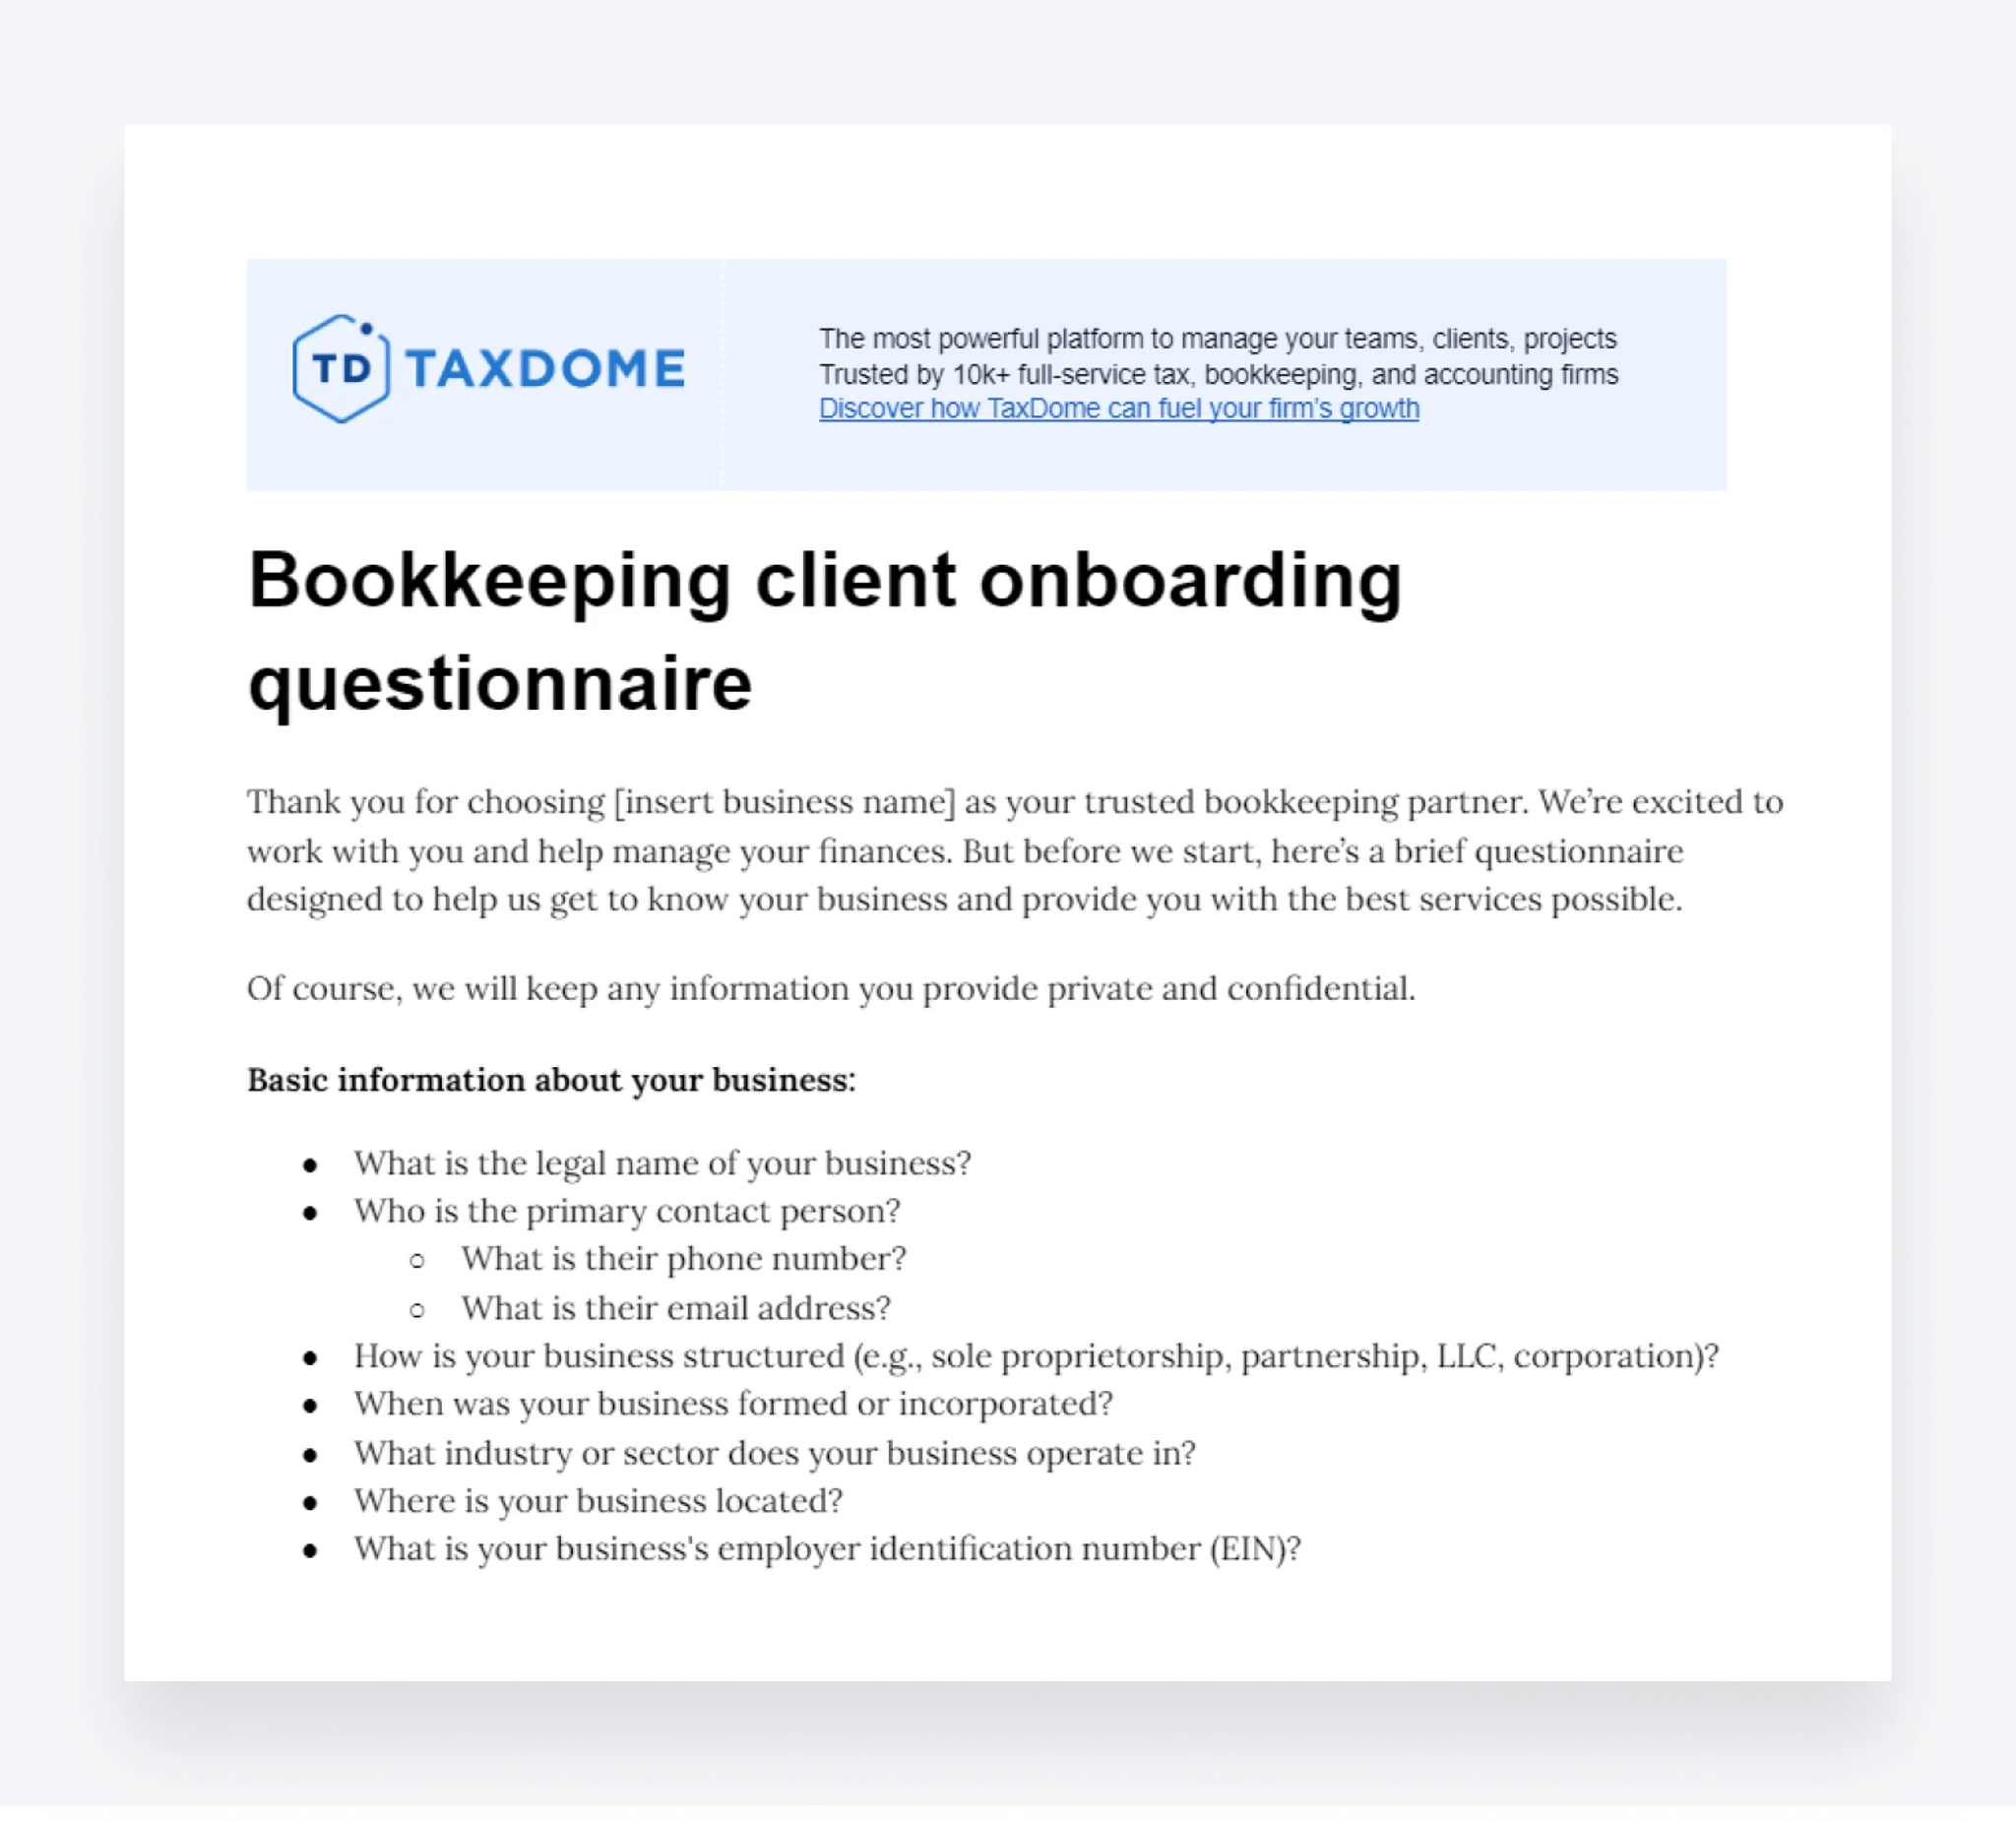
The best way to capture this information is by using a bookkeeping client onboarding questionnaire. You can download our template for free and customize it to suit your needs.
Collecting this information from clients allows you to meet their needs more effectively. With TaxDome’s accounting CRM, you can store all of this information in client profiles with contact details, custom fields, notes, payment details, and everything you need to manage client relationships.
4. Set up client communication and collaboration channels
Setting up efficient collaboration and communication channels during the onboarding phase improves the whole client relationship. You can make every document upload, transaction clarification, signature request, and invoice payment effortless.
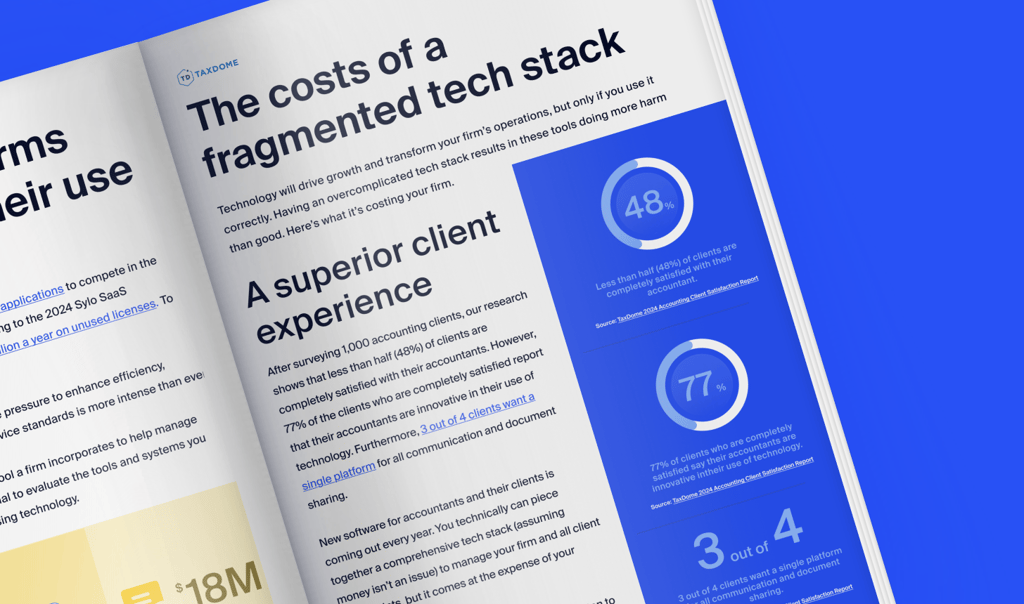
According to TaxDome’s Client Satisfaction Report, 75% of clients are willing to spend up to four hours providing information if the experience is seamless. Crucially, 3 in 4 clients say they want one platform for all communication and document sharing with their accountant.
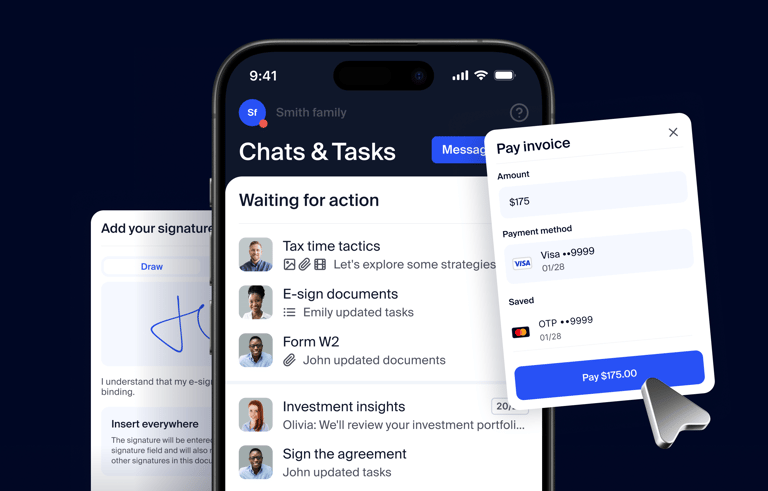
This is why we built our client portal: a secure, private space for communication, document sharing, e-signatures, invoice payments, and client tasks.
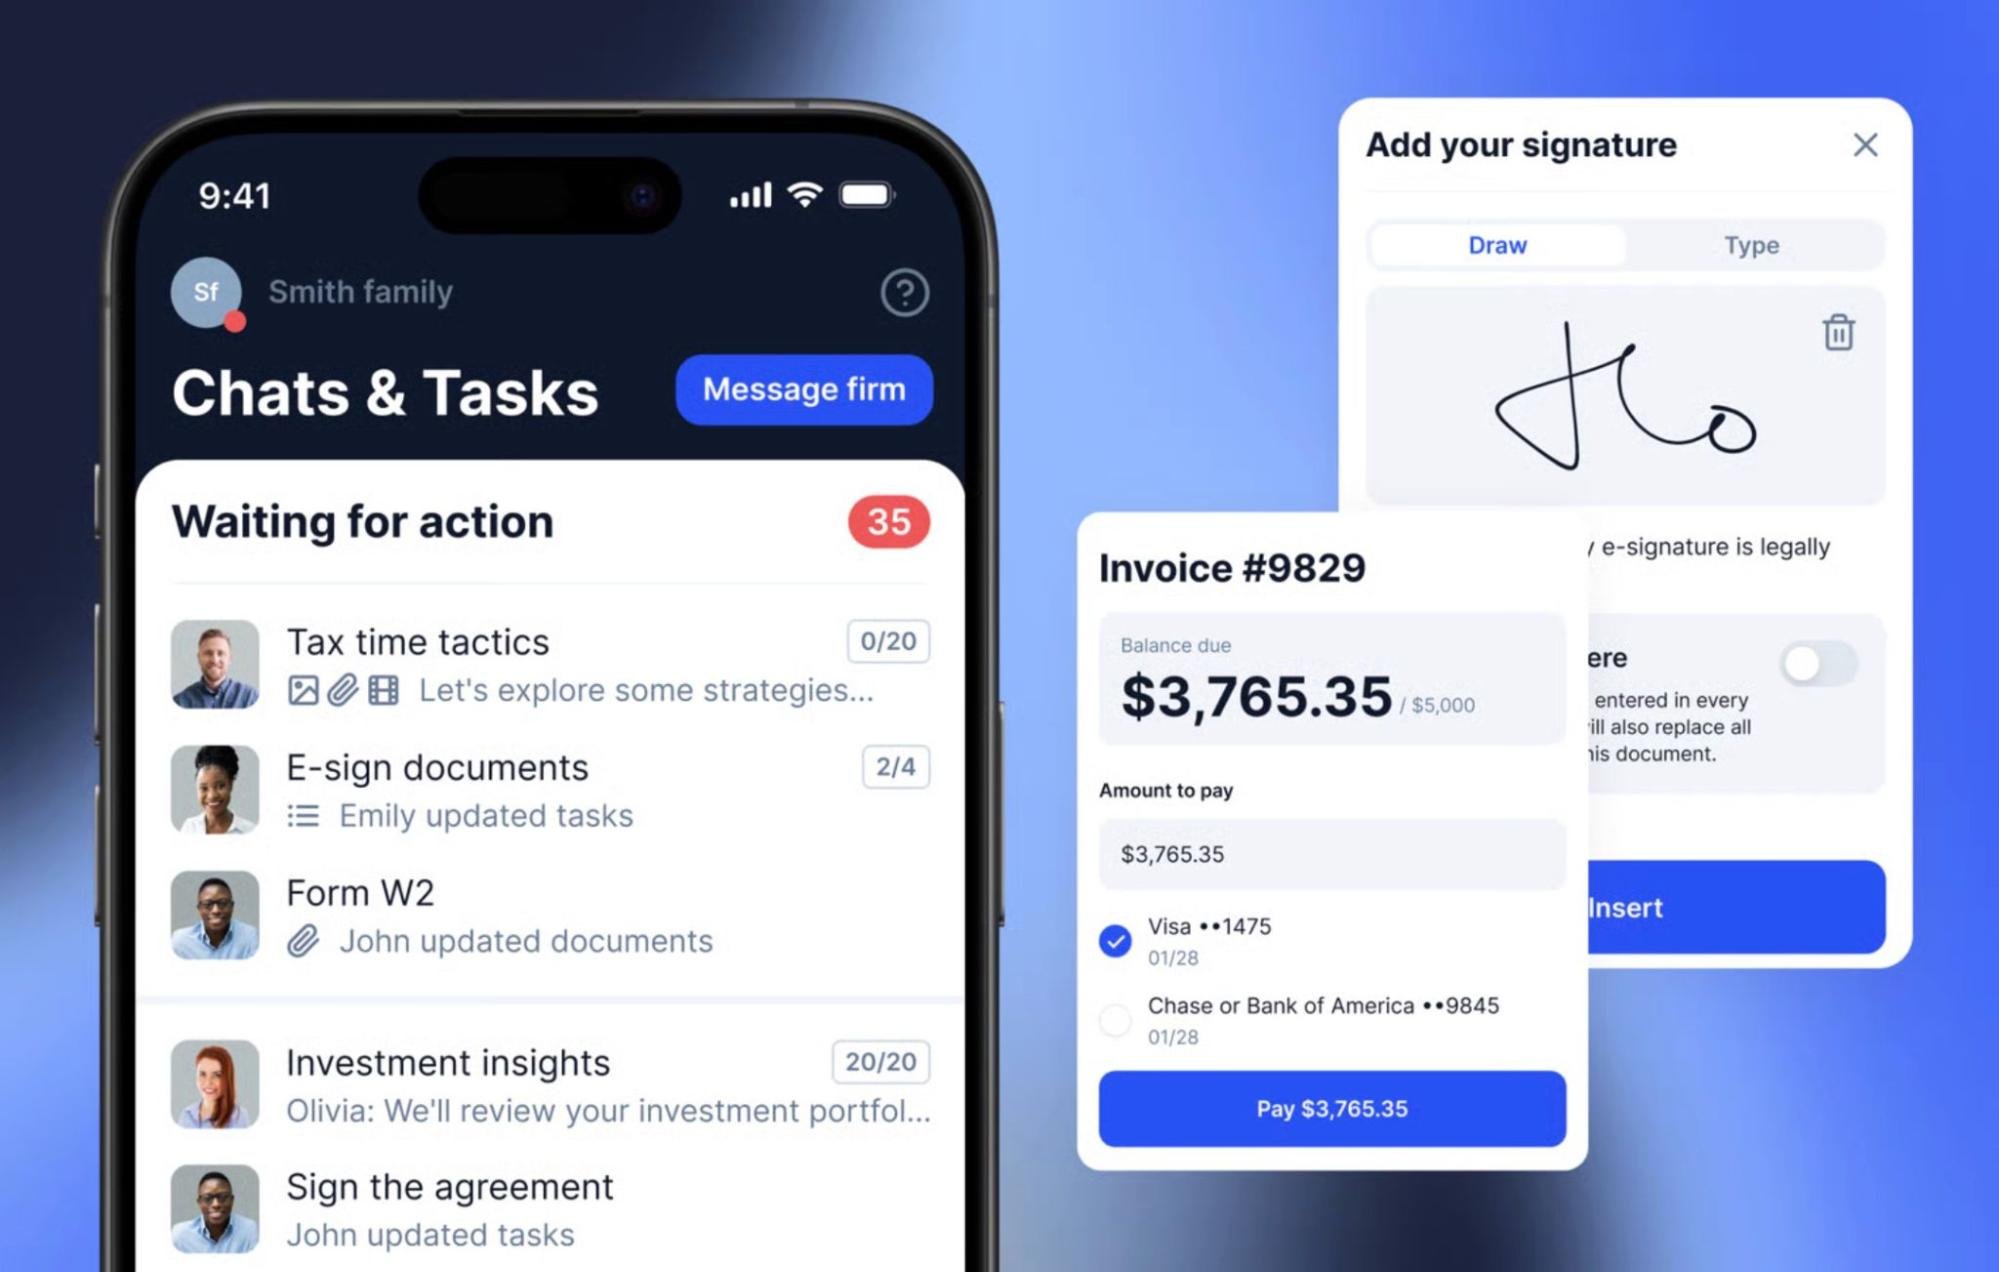
As soon as clients sign the contract, invite them to join the client portal so you can start gathering the financial documents you need. To make client interactions as effortless as possible, we’ve also developed a client mobile app for full access to portal features on the go.
Clients can even scan documents with their phone, convert them into PDF files, and sign them from anywhere.
You also need to sync your practice management platform with clients’ accounting software to import data automatically.
However, syncing alone doesn’t resolve instances of missing or incorrect data. To resolve this, we recently launched the TaxDome Bookkeeping Hub across all plans, at no extra cost. The new tool imports data from clients’ general ledgers and simplifies bulk requests for missing transactions, uncategorized transactions, and other discrepancies.
5. Gather the client’s financial records
Once clients are set up on the client portal, you’re ready to start gathering financial documents. This typically includes:
- Bank and credit card statements
- Accounts receivable summaries
- Accounts payable summaries
- General ledger reports
- Payment records
- Bills and invoices
- Receipts
- Income records
- Contracts
- Asset records
- Inventory reports
- Payroll reports
- Loan statements
- Previous tax filings
- Historical bookkeeping data
Requesting financial records is one of the biggest points of friction for bookkeeping clients. This is why it’s so important to have a client portal that makes this process as easy as possible for them.
6. Review client documents
By this point, you’ve automated the inefficiency out of client communications, document sharing, and data entry. You’ve partially automated reconciliation and any bookkeeping errors, too. All that’s left now is to manually review client documents to make sure everything is in order and resolve any remaining issues.
You’ve already improved the efficiency of every stage of the bookkeeping process until this point. This is where you can focus your time and effort on delivering 100% accuracy for clients.
7. Request feedback from the client
Once onboarding is complete, you’re ready to start working on the client’s bookkeeping service. Now is a good time to ask them for feedback on how the onboarding process went.
This is an invaluable source of qualitative insights on how to improve onboarding for future clients.
Again, you can fully automate this with email sequences asking for feedback throughout the client relationship. Just be aware that you may have asked a lot from them during the onboarding process — so make feedback as easy as possible for them.
New bookkeeping client onboarding checklist templates
In this section, we’ll provide you with two free bookkeeping client onboarding checklists — one for new clients and another for returning ones. The steps and bullet points are just examples, so feel free to add, modify, or remove sections as you see fit.
Template 1: Onboarding new bookkeeping clients
STEP 1. Finalize the contract and agreement
• Customize your service agreement and contract templates for the client
• Give an overview of your firm and the benefits of working with you
• Specify the terms of the agreement and expected outcomes
• Clarify your pricing and deliverables
• Include all terms and conditions
• Automate e-signing and the first invoice payment
STEP 2. Start the welcome sequence
• Set up your automated welcome pipeline for all new clients
• Customize the welcome email template for each client
• Include next steps for clients — eg: client portal invite, doc requests, first invoice
• Automate the first invoice payment
STEP 3: Gather client and business information
Client information:
• Business name
• Address
• Employer identification number (EIN)
• Contact details
• Industry
Legal and regulatory documents
• Business registration documents,
• Operating agreements or partnership agreements
• Licenses and permits
Information about the client’s software:
• Login credentials for accounting platforms
• A list of all accounts used in the accounting system
Payroll and HR documents:
• Employee information
• Payroll reports
• Information about benefits and bonuses
Vendor and customer information:
• List of vendors, including contracts and payment terms
• List of customers, including contracts, and payment terms
Insurance policies:
• Liability insurance
• Property and equipment insurance
• Worker’s compensation insurance
Service requirements:
• Goals and expectations
• Timelines and deliverables
• Any special requirements
• Any issues that need addressing
STEP 4: Set up client collaboration and communication channels
• Streamline communications into one platform
• Automate email, messaging, and client task workflows
• Onboard new clients to the client portal and mobile app
• Sync with client’s accounting software
• Automate data entry and client requests
STEP 5: Gather the client’s financial records
• Bank and credit card statements
• Accounts receivable summaries
• Accounts payable summaries
• General ledger reports
• Payment records
• Bills and invoices
• Receipts
• Income records
• Contracts
• Asset records
• Inventory reports
• Payroll reports
• Loan statements
• Previous tax filings
• Historical bookkeeping data
STEP 6: Review client documents
• Review all information and documents
• Chase client for missing information if necessary
• Add client info to your CRM, bookkeeping software, and other systems
STEP 7: Request feedback from the client
• Send feedback form or message
• Review process and implement changes where necessary
To access this template, click on the link below:
Template 2: Onboarding returning bookkeeping clients
STEP 1. Review client relationship and send new engagement letter if necessary
If the client already signed an engagement letter that covers the job they want you to do, you can miss this step. If not, you’ll need to send a new engagement letter, including:
• Information about your services and prices
• Formal terms and conditions
• Information on how to pay
STEP 2. Send a “welcome back” email
• Warm, “welcome back” message
• Outline the next steps and what to expect
• Invitation to your software and client portal (if not already set up)
Once the client is set up on the client portal, you can move on to step 2.
STEP 3: Gather information and documentation (if necessary)
Ask the client to add or update any information that has changed since you last worked with them, including:
Client information:
• Business name
• Address
• Employer identification number (EIN)
• Contact details
• Industry
Financial records:
• Bank statements
• Credit card statements
• Previous financial statements
• Accounts receivable and payable reports
Tax information:
• Previous tax returns
• Sales tax information
• Payroll tax information
Legal and regulatory documents
• Business registration documents,
• Operating agreements or partnership agreements
• Licenses and permits
Information about the client’s software:
• Login credentials for accounting platforms
• A list of all accounts used in the accounting system
Payroll and HR documents:
• Employee information
• Payroll reports
• Information about benefits and bonuses
Vendor and customer information:
• List of vendors, including contracts and payment terms
• List of customers, including contracts, and payment terms
Insurance policies:
• Liability insurance
• Property and equipment insurance
• Worker’s compensation insurance
STEP 3: Review documents and add the client to your systems
• Review all information and documents
• Chase client for missing information if necessary
• Add updated client info to your CRM, bookkeeping software, and other systems
To access this template, click on the link below:
Automate the client onboarding process with TaxDome
Manual onboarding creates bottlenecks from the start of every client relationship. Each follow-up, document request, or missing detail adds friction. But, if you automate the onboarding process, your team can get to work as soon as clients sign on the dotted line.
TaxDome is the only practice management platform on the market capable of automating client onboarding from start to finish.
You can create fully automated pipelines for proposals and engagements, document gathering, client follow-ups, bookkeeping tasks, and more. You can even assign invoices to key stages of the onboarding process to get the first payment before your team gets to work.
You don’t need a dozen tools for client communication, document management, or invoicing. TaxDome gives you everything you need to automate client onboarding and bookkeeping services in one platform.
Every inefficiency you automate with TaxDome unlocks more time and resources to focus on activities that deliver value for your clients and revenue for your firm.

Aaron produces practical content for TaxDome, drawing on 11 years in SaaS copywriting and marketing. He helps accounting and tax professionals get the most from TaxDome and other tools, making complex topics clear and actionable.
Get your free guide

Thank you!
The guide copy has been sent to your email. Please check your inbox!
Recommended articles

Client onboarding software for accountants: Streamlining the first step in client relationships

12 best CRMs for accountants, bookkeepers and tax professionals in 2026

5 Ways to Protect Your Clients Against Tax Identity Theft